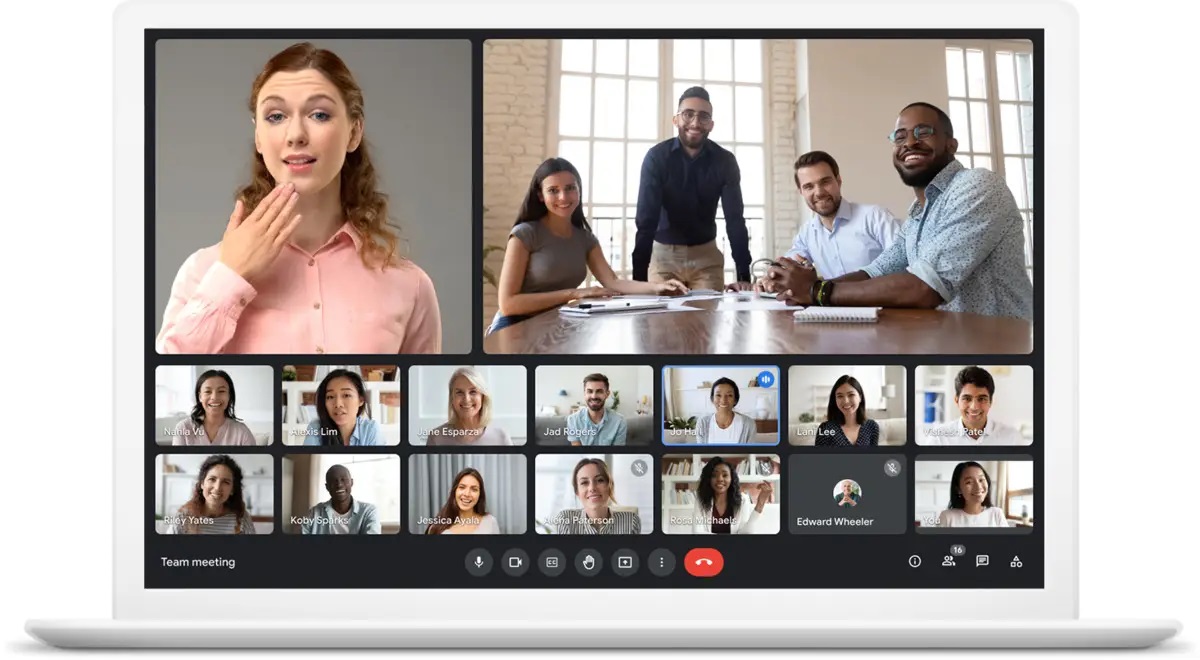
Looking for possible fixes for the Google Meet camera not working issue? Your search concludes here. Read for further details!
Have you ever experienced difficulty joining a Google Meet meeting? If you answered yes, then you are not alone. It is particularly aggravating when you are preparing to attend an important meeting. The good news is that the Google Meet webcam not detected OR Google Meet Camera Not Working problem is solvable, so there is no need for concern.
In this article, I’ll explore a few viable ways that you may use to fix the Google Meet camera not working effectively.
Before We Start:
Verify that the following factors did not cause your camera to fail in Google Meet before attempting to resolve the camera not working in Google Meet Windows 10 issue.
- Ensure that your webcam is correctly connected using a USB webcam.
- Your camera is compatible with different devices and apps.
- You’re using the most recent release of the video communication service (Google Meet).
- Your Internet connection is reliable and operational.
- No other app has access to the camera; hence, no app is blocking Google Meet.
Fix: Google Meet Camera Not Working on Windows PC
If your Google Meet camera not working, work your way down the list until you discover the ideal solution for “No Camera Found” on Google Meet. So without further ado, let us begin:
Fix 1: Give Access to the Camera on your System
If your computer restricts access to your camera, you will receive a notification indicating Google Meet Camera Not Working. Follow the procedures below to grant access to your device’s camera.
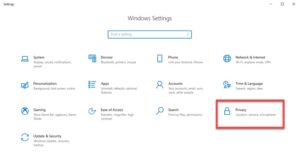
- Launching Windows Settings is required to get started. You can accomplish this rapidly by simultaneously tapping the Windows and I keys.
- Find Privacy in the Settings window and click it.
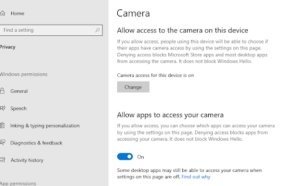
- Next, scroll down until the Camera option appears on the left. Select it, then click the Change option button. Additionally, ensure that camera access is enabled for your system. Afterward, ensure that Allow apps access to my camera is likewise enabled.
Test the issue after rebooting the Google Meet app. If these updates to the settings are already enabled, continue using the other alternatives listed below to resolve the camera not working in the Google Meet issue.
Fix 2: Allow Camera Access from Web Browser Settings
Did you know, your web browser also requires access to the camera? Of course, you can also use Google Meet in other web browsers, but Google Chrome offers the greatest experience. Below is the procedure for determining whether Google Chrome has access to your camera:
1. First, copy and paste the following to your Chrome address bar.
chrome://settings/content/camera
2. After this, check if you have selected an option reading Sites can ask to use your Camera.
3. You’ll be prompted with a box once you attend a meeting in Google Meet. Then, tap on Allow to use your camera and microphone.
4. Copy and paste the chrome://settings/content/camera to the address bar of your Google Chrome browser. And, then check if you have permitted the Google Meet site to access your camera in browser (Chrome) settings.
Reboot your PC, then try to join a meeting through Google Meet to test the issue. Finally, if this hack does not fix the Google Meet Not Able To Access Camera And Microphone problem, try the following fix.
Fix 3: Update your Outdated Camera Drivers
Are you shouting, “why is my Google Meet camera not working”? As you may be aware, a device driver is a piece of software that provides an interface between hardware devices and the operating system. Google Meet may not recognize the camera if you are using old, broken, corrupted, or missing camera drivers.
Therefore, you should always use the most recent versions of your camera’s drivers to avoid such troubles. Bit Driver Updater can be used to accomplish the same task in a flash.
Furthermore, Bit Driver Updater is one of the most reliable and straightforward methods for updating Windows PC drivers. The app determines which version of Windows you are using and selects the best compatible drivers.
The driver updater utility only supplies drivers that have been WHQL-tested and validated. In contrast to others, it has a massive driver database. It is simple to update drivers with either the free or premium edition of Bit Driver Updater.
With its pro version, all PC drivers may be installed with a single click. Although the free version allows you to update a single driver at a time, doing so can be time-consuming. Therefore, using Bit Driver Updater’s pro version is recommended to save a lot of time and manual effort.
Take a look at the simple steps below to understand how Bit Driver Updater works:
- Download Bit Driver Updater.
- Run the downloaded file & follow the setup wizard to finish the installation.
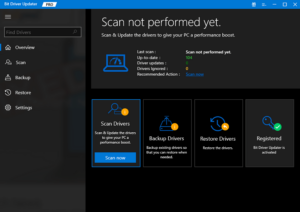
- Once the program has been installed, select Scan and wait for the driver updater to do a complete scan of your device for outdated or incompatible drivers.
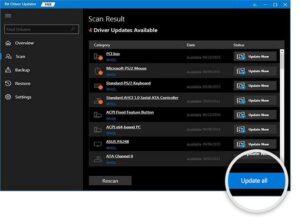
- Then, please navigate the camera driver and click the Update Now button. Similarly, you can update more drivers by clicking the corresponding option next to the driver you desire to update if you wish to save time by updating all outdated drivers with a single click, select Update All.
Remember that Bit Driver Updater’s pro version comes with 24/7 technical support and a full refund guarantee, but only for a limited period.
Fix 4: Check your Internet Bandwidth
If updating the camera drivers does not resolve the issue with the Google Meet camera, you can implement this patch to restore normal operation. Network issues such as sluggish internet connection and low bandwidth may be responsible for your webcam’s malfunction. How to determine internet speed:
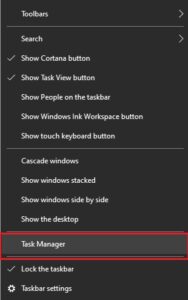
- Tap right on the taskbar and choose Task Manager from the available options.
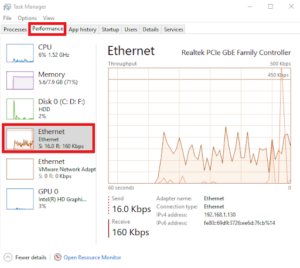
- In the next prompt, select the Performance tab.
- Then, tap on Ethernet.
The recommended send and receive data rates for video conferences are between 1.5 and 2 Mbps. If your Internet connection speed is too slow, try connecting to a network with a faster and more steady speed. Then, restart Google Meet and verify that the microphone issue has been repaired. If not, proceed to the next solution.
Fix 5: Reboot your PC or Web Browser
Your camera/webcam may malfunction due to PC difficulties or bugs, such as software conflicts. In addition, an overloaded web browser is a possible cause of the Google Meet camera not working. Restarting your system and web browser is an additional viable solution for dealing with both factors.
Restarting your computer system or program has always been the most straightforward method for locating and fixing issues. Consequently, this may also aid you. For example, try joining a meeting using the video conferencing program to determine whether the Google Meet Camera Not Working issue has been resolved.
Fix 6: Turn Off MediaFoundation Video Capture in Chrome
If none of these solutions worked for you, don’t panic and fix your camera-related issues. Instead, try out this last resort. Reportedly, activating MediaFoundation Video Capture in a web browser may create webcam difficulties and impair webcam functionality. Therefore, deactivating this browser function is a viable solution for the Google Meet Camera Failure Problem. How it works:
ALSO SEE: MacBook Pro Overheating
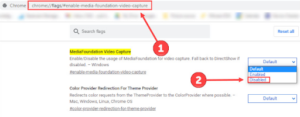
1. Launch your Google Chrome browser, then copy & paste the following on its address bar.
chrome://flags/#enable-media-foundation-video-capture
2. From the drop-down menu list, tap on Disable.
After completing the instructions above, restart Chrome and verify that the Google Meet microphone issue on Windows 10 has been resolved.
Conclusion – Google Meet Camera Not Working on Windows 11/10/8/7: FIXED
In this blog post, I’ve provided you with a list of all the possible workarounds for the Google Meet camera failed Windows PC. Hopefully, your camera is now working generally on Google Meet.
Further, in the comments section below, please let us know if you have any recommendations or questions about the subject.
